Explaining the procedure to parents ensures there are no surprises and gets them on your side. Always plan your distraction techniques and involve play therapists early if they are available.
Infants (Under 1 year)
Position the baby safely on the bed.
Have the parent cuddle or pat them for reassurance.
Ensure you have a clear, unobstructed line of sight to the arm.
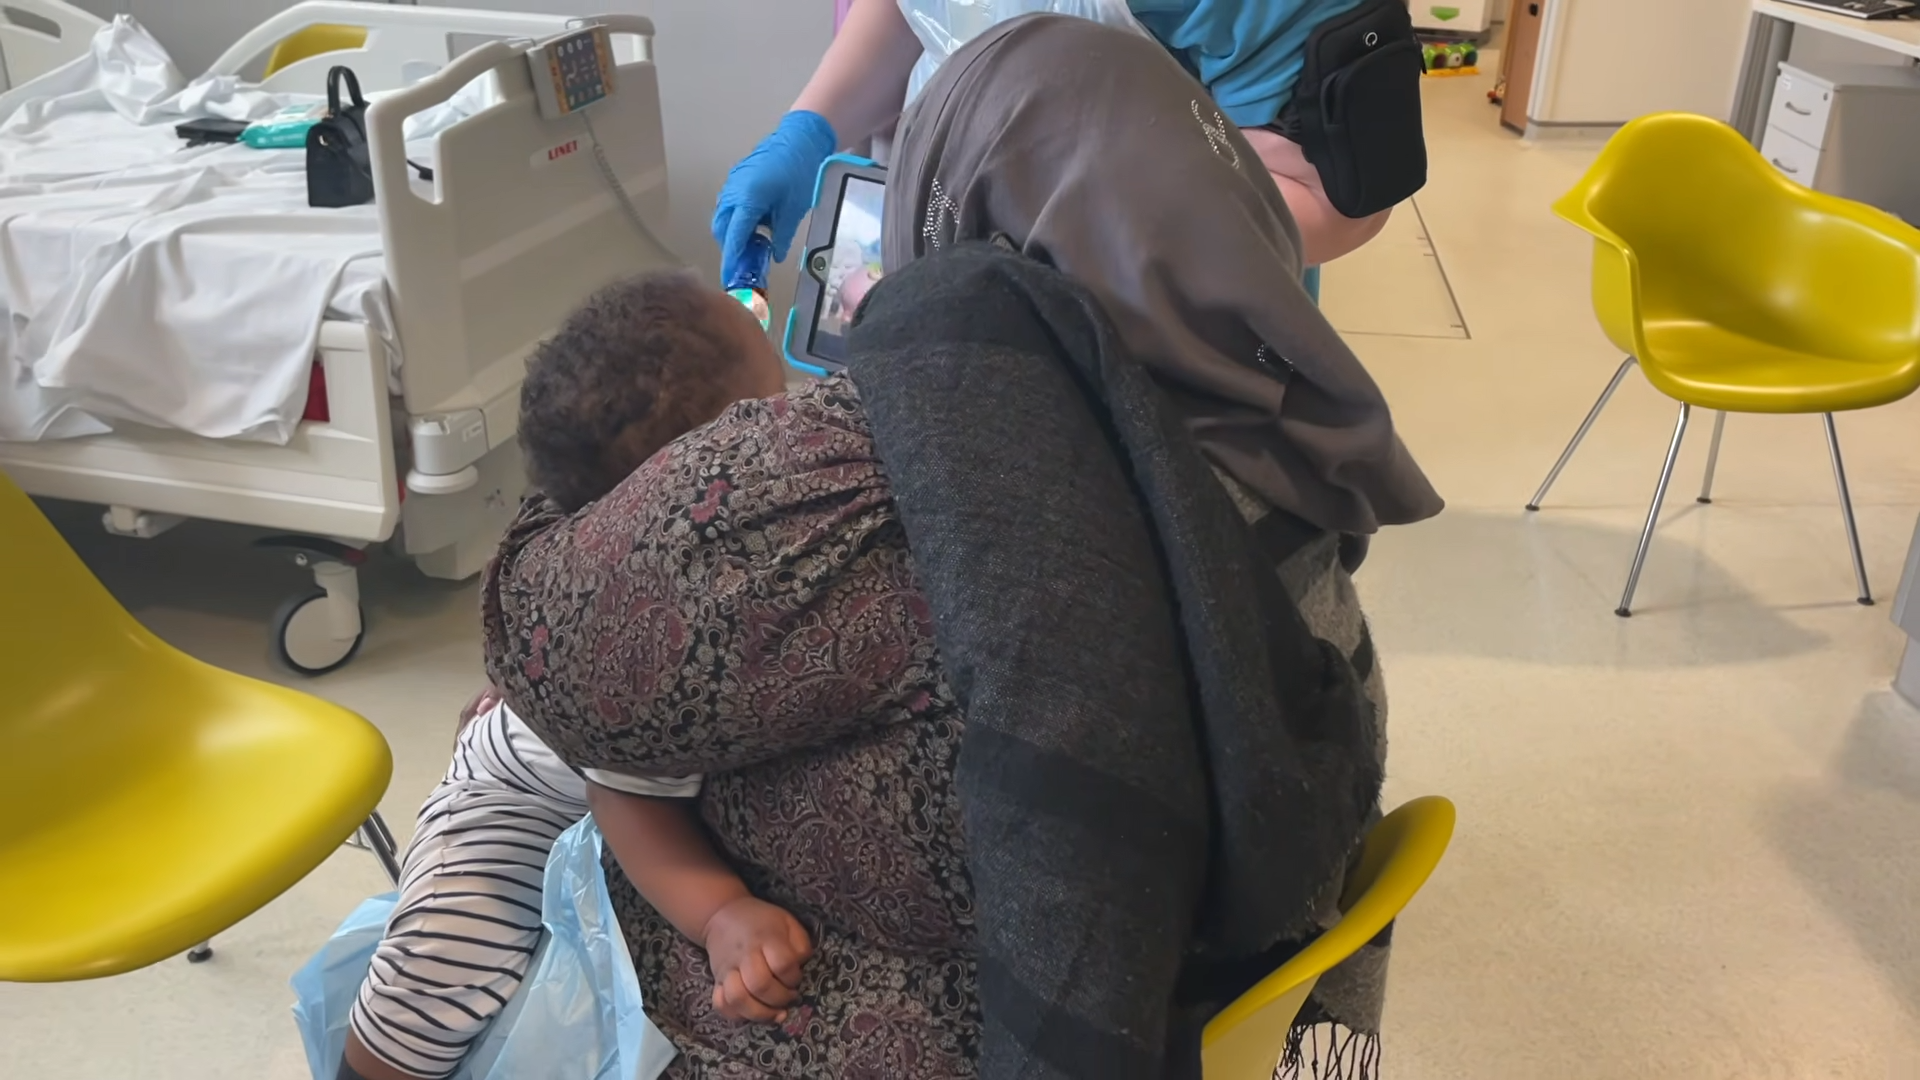
Toddlers & Pre-Schoolers
Sit the child on the parent's lap.
Use the "straddle" method (one leg on each side, facing tummy-to-tummy) or place both legs over one side of the parent's lap.
Instruct the parent to hold the child's arm securely and direct their attention elsewhere using a screen or toy.
💡 Pro-Tip:
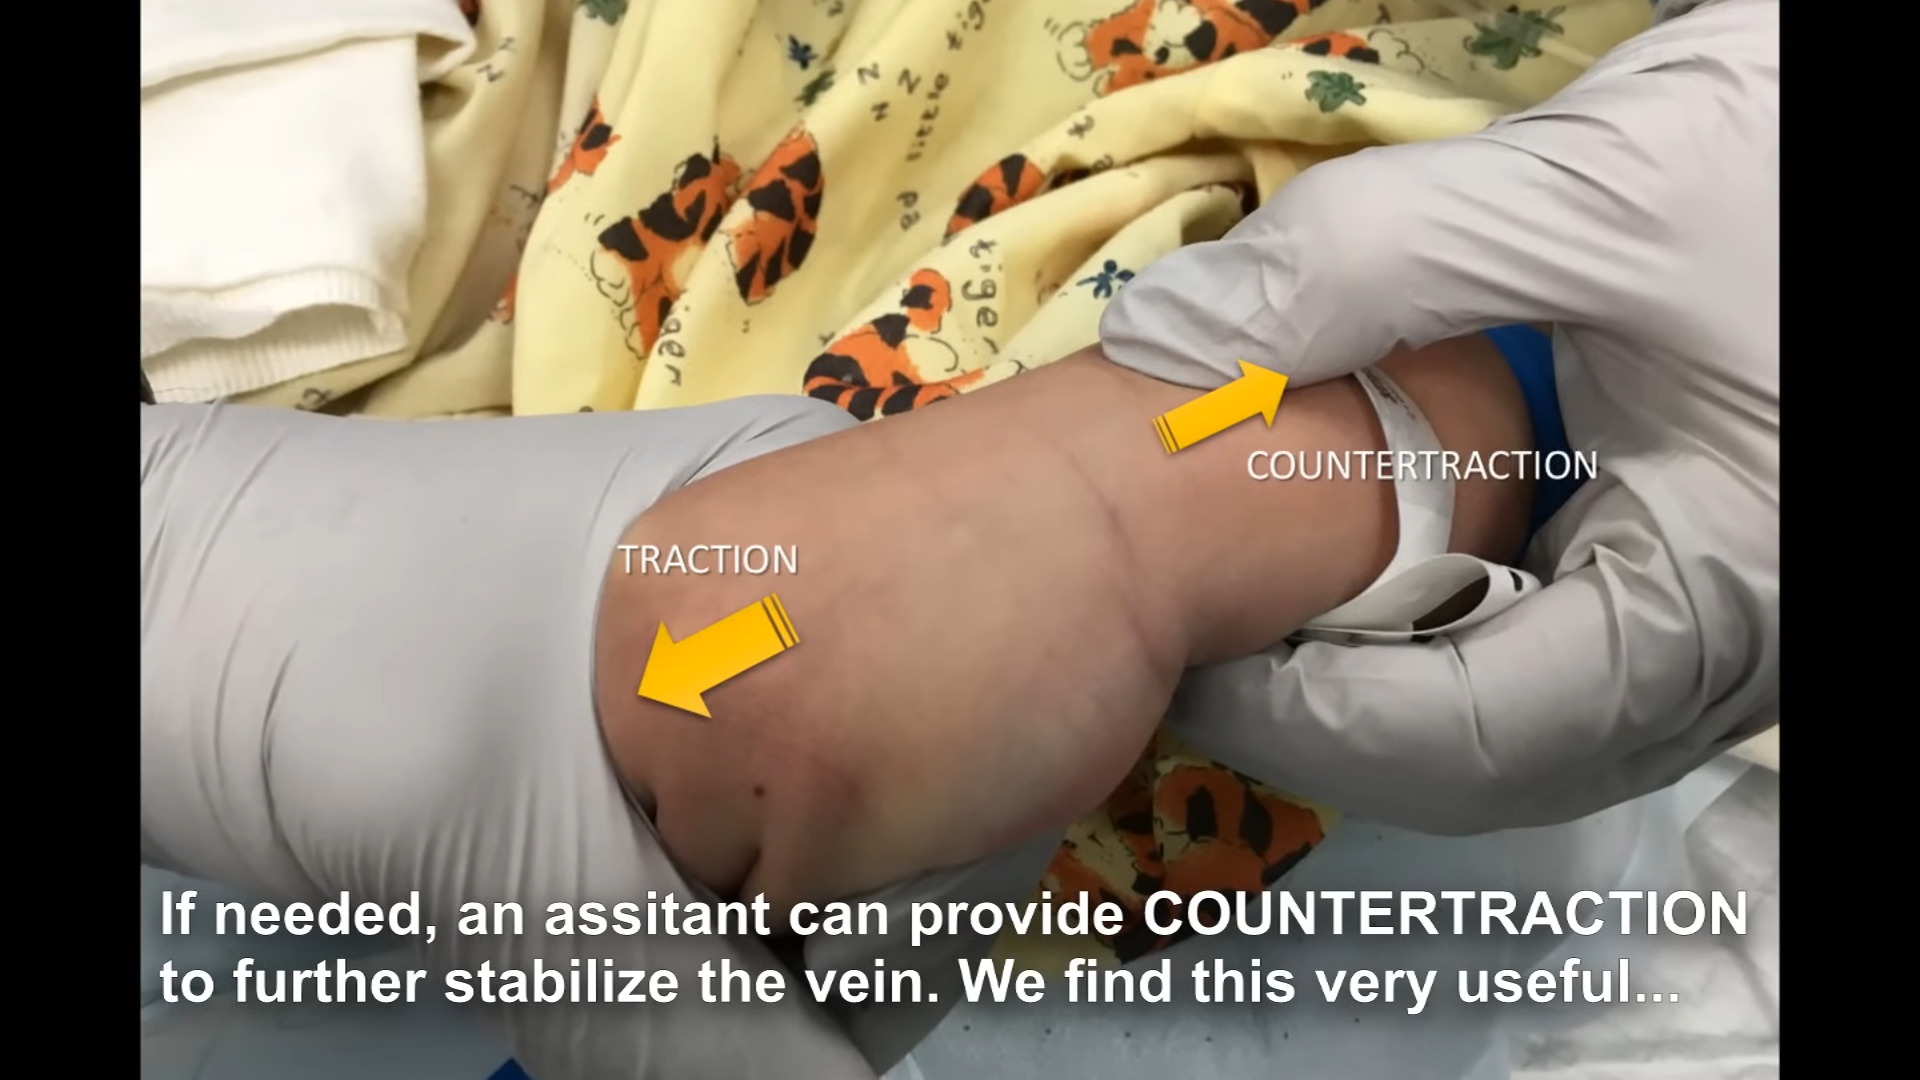
Paediatric veins roll easily. Ask your assistant or the parent to provide countertraction from the other side of the limb to lock the vein completely in place.
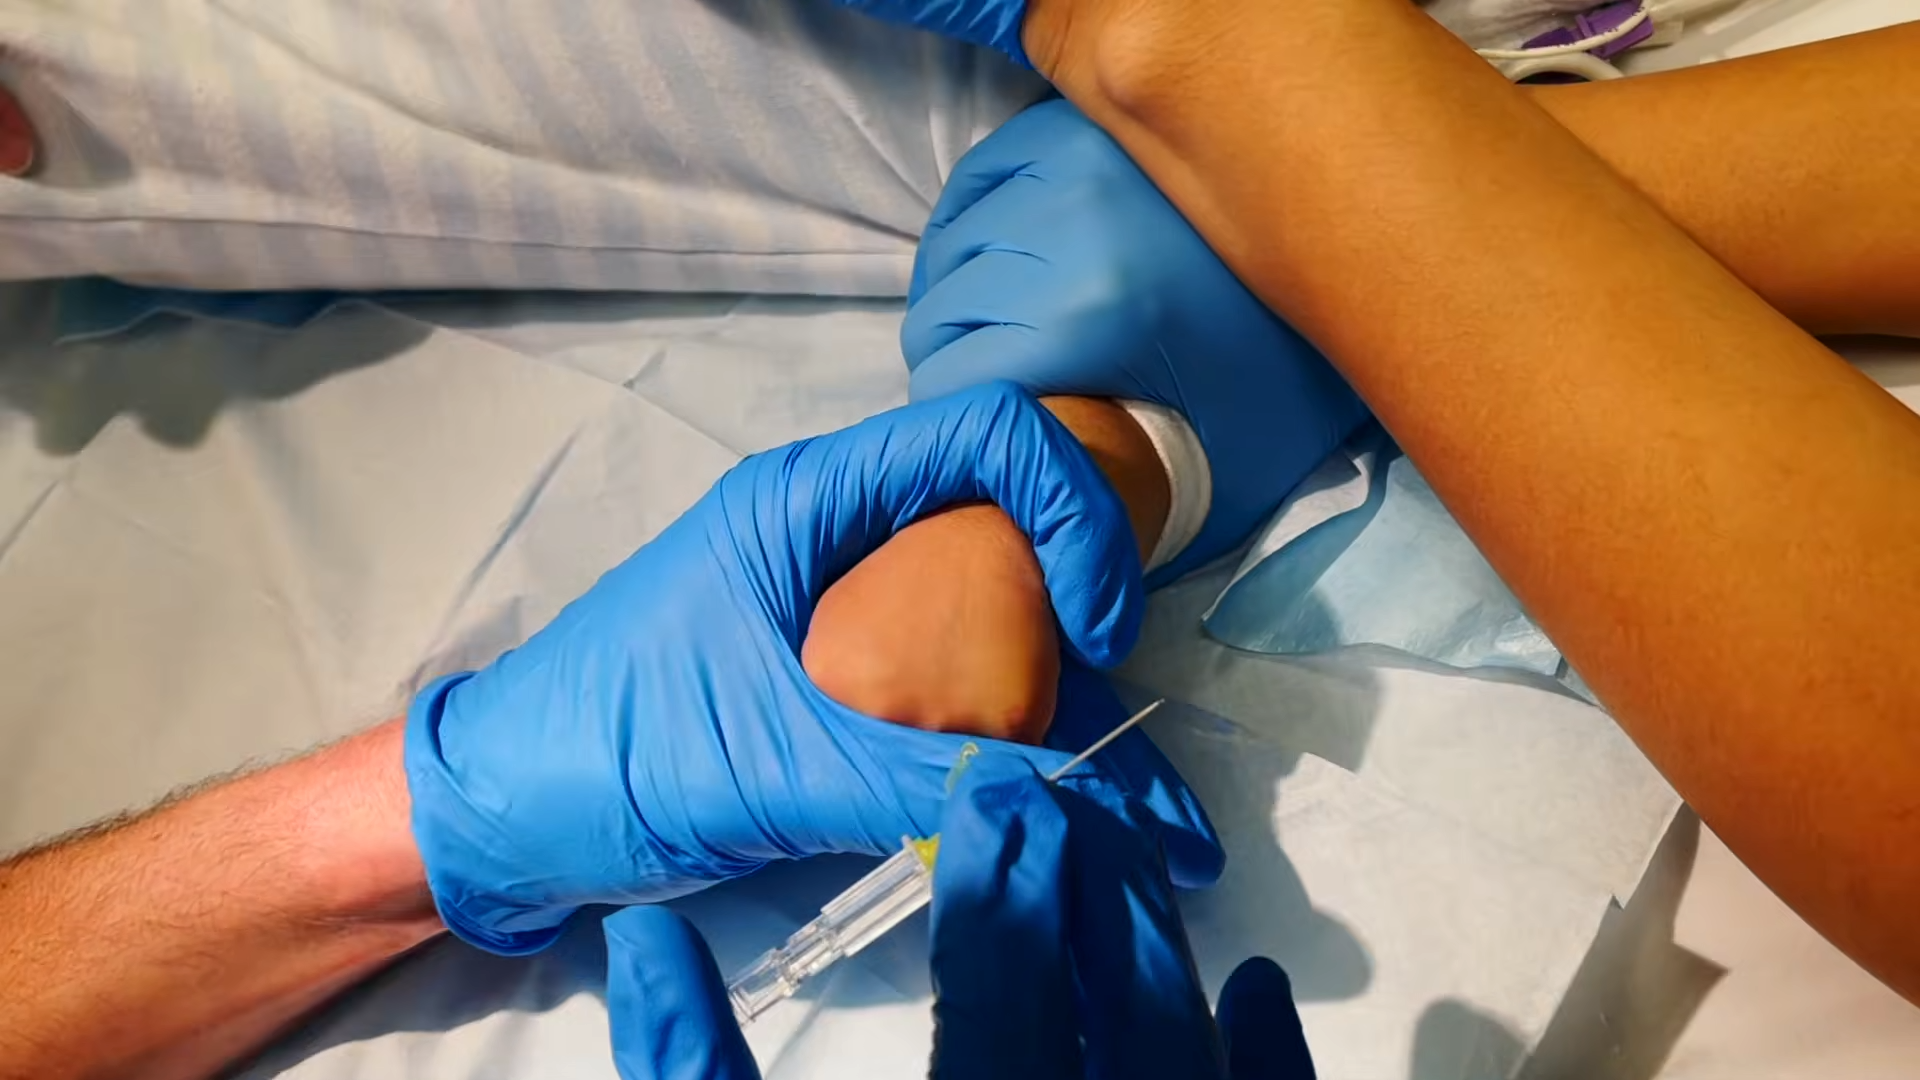
Heel Pricks & Capillary Gases (CBG)
TL;DR Summary:
Warm the foot and use the sides (lateral/medial) of the heel.
Gather a lancet, capillary tube, chloraprep, cotton ball, and oral sucrose for analgesia. Position the foot at or below the level of the baby's body to rely on gravity.
Site Selection
Clean the lateral or medial aspect of the heel and allow it to dry completely.
🚨 CRITICAL WARNING:
Never puncture the middle of the heel. Doing so risks permanent damage to the plantar and calcaneal nerves.
The Technique
Puncture the skin and angle the capillary tube slightly so the blood flows continuously up the tube.
Tip the tube downwards if a large air bubble appears to remove it safely with gravity.
Gently pump the heel to allow time for capillary refill.
When walking to the gas machine, occlude one end with your finger so the blood doesn't drop out.
🚨 CRITICAL WARNING:
Do not continually squeeze the heel, as this will result in a haemolysed, rejected sample.
IV Cannulation
TL;DR Summary:
🟡 Yellow (24G) for infants. 🔵 Blue (22G) for older kids/contrast.
1mm Needle Gap: You must push slightly past the first flashback.
Use the "Two Flashback" technique before threading.
🔵 Blue (22G): For older children or if high-flow IV contrast is needed.
Anatomy of the Catheter (The 1mm Gap)
The plastic catheter sheath does not extend all the way to the needle tip. There is a ~1mm gap between the sharp bevel of the needle and the start of the plastic tube. Always insert with the bevel facing UP.
Vein Stabilization
Paediatric veins roll easily. Use traction and countertraction to lock the vein in place before inserting the needle.
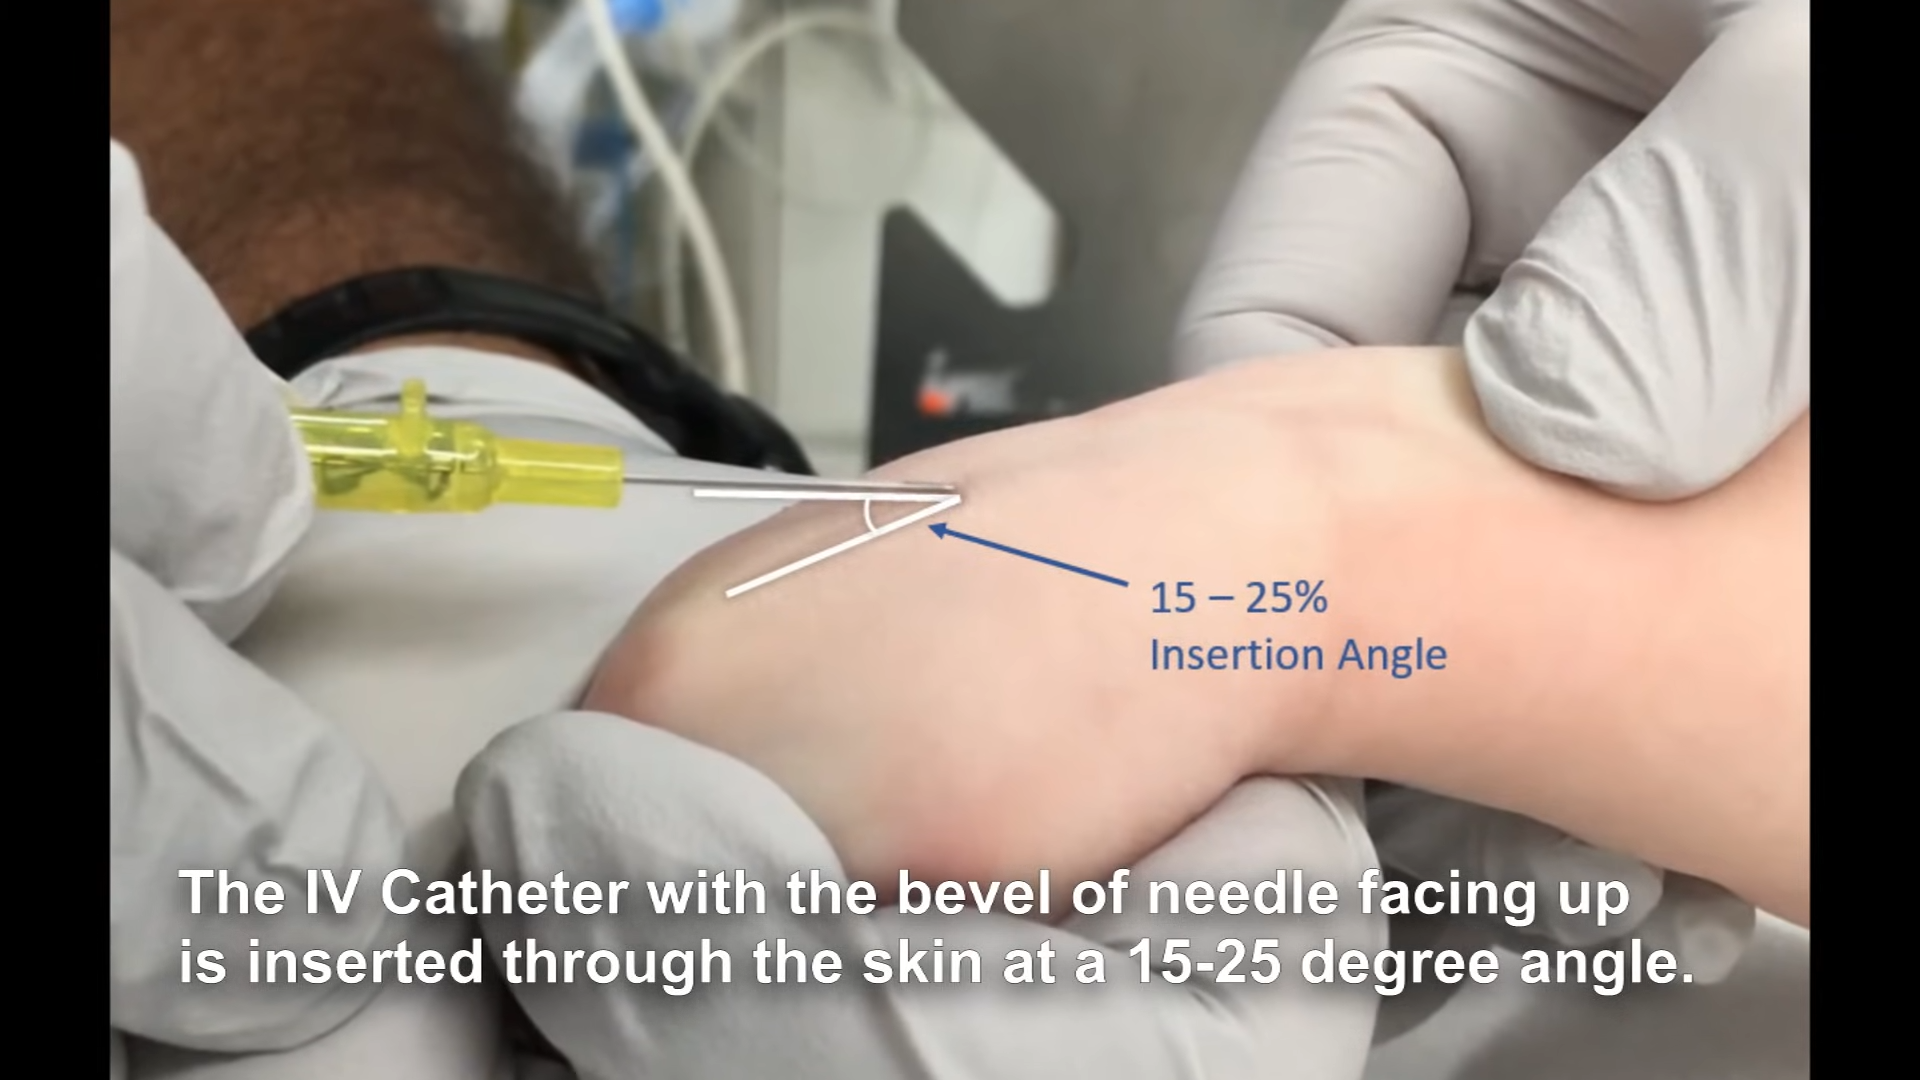
The "Two Flashback" Insertion Technique
Step 1: Initial Entry
Insert the needle through the skin at a 15 to 25-degree angle.
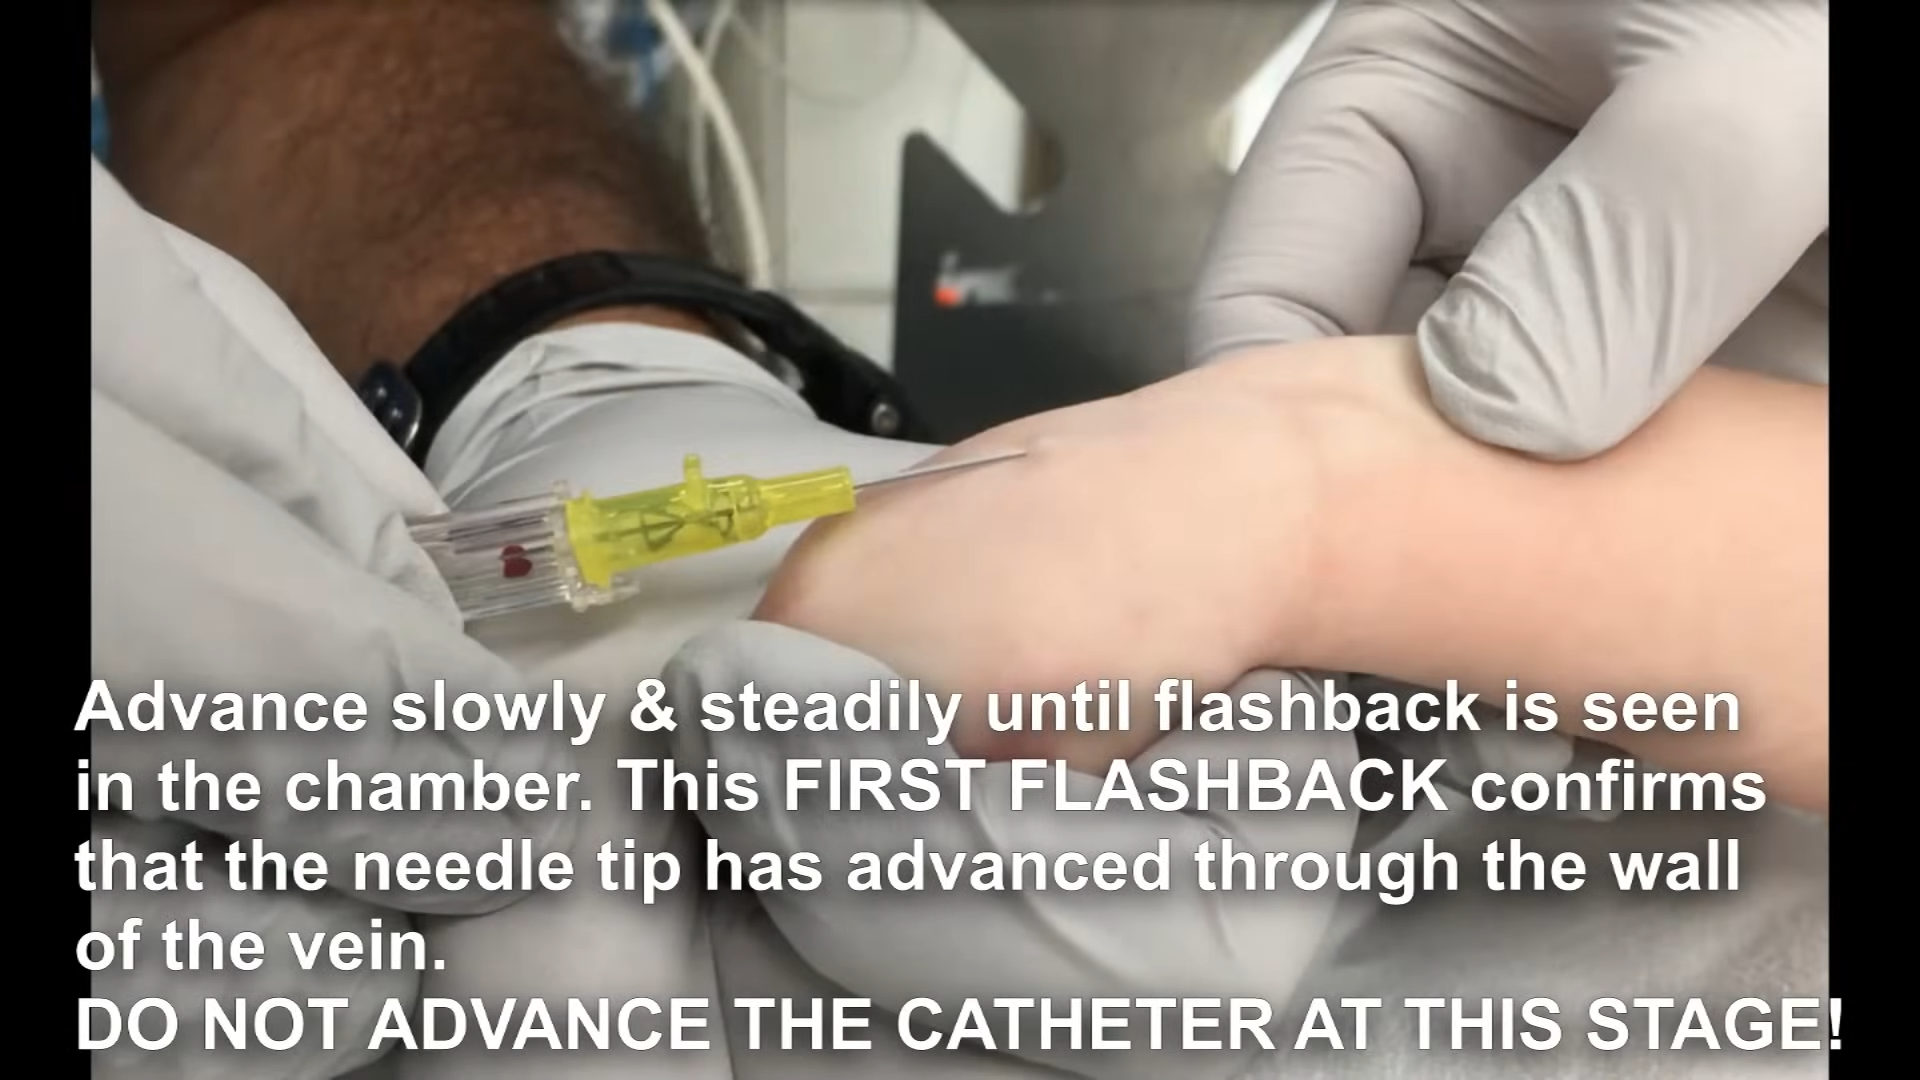
Step 2: Drop the Angle
Once through the skin, immediately drop the angle so it is almost flat against the skin.
Step 3: The FIRST Flashback
Stop advancing as soon as you see blood in the chamber. 🚨 DO NOT advance the plastic catheter yet! The needle tip is in the vein, but the plastic tubing is still outside the vessel wall.
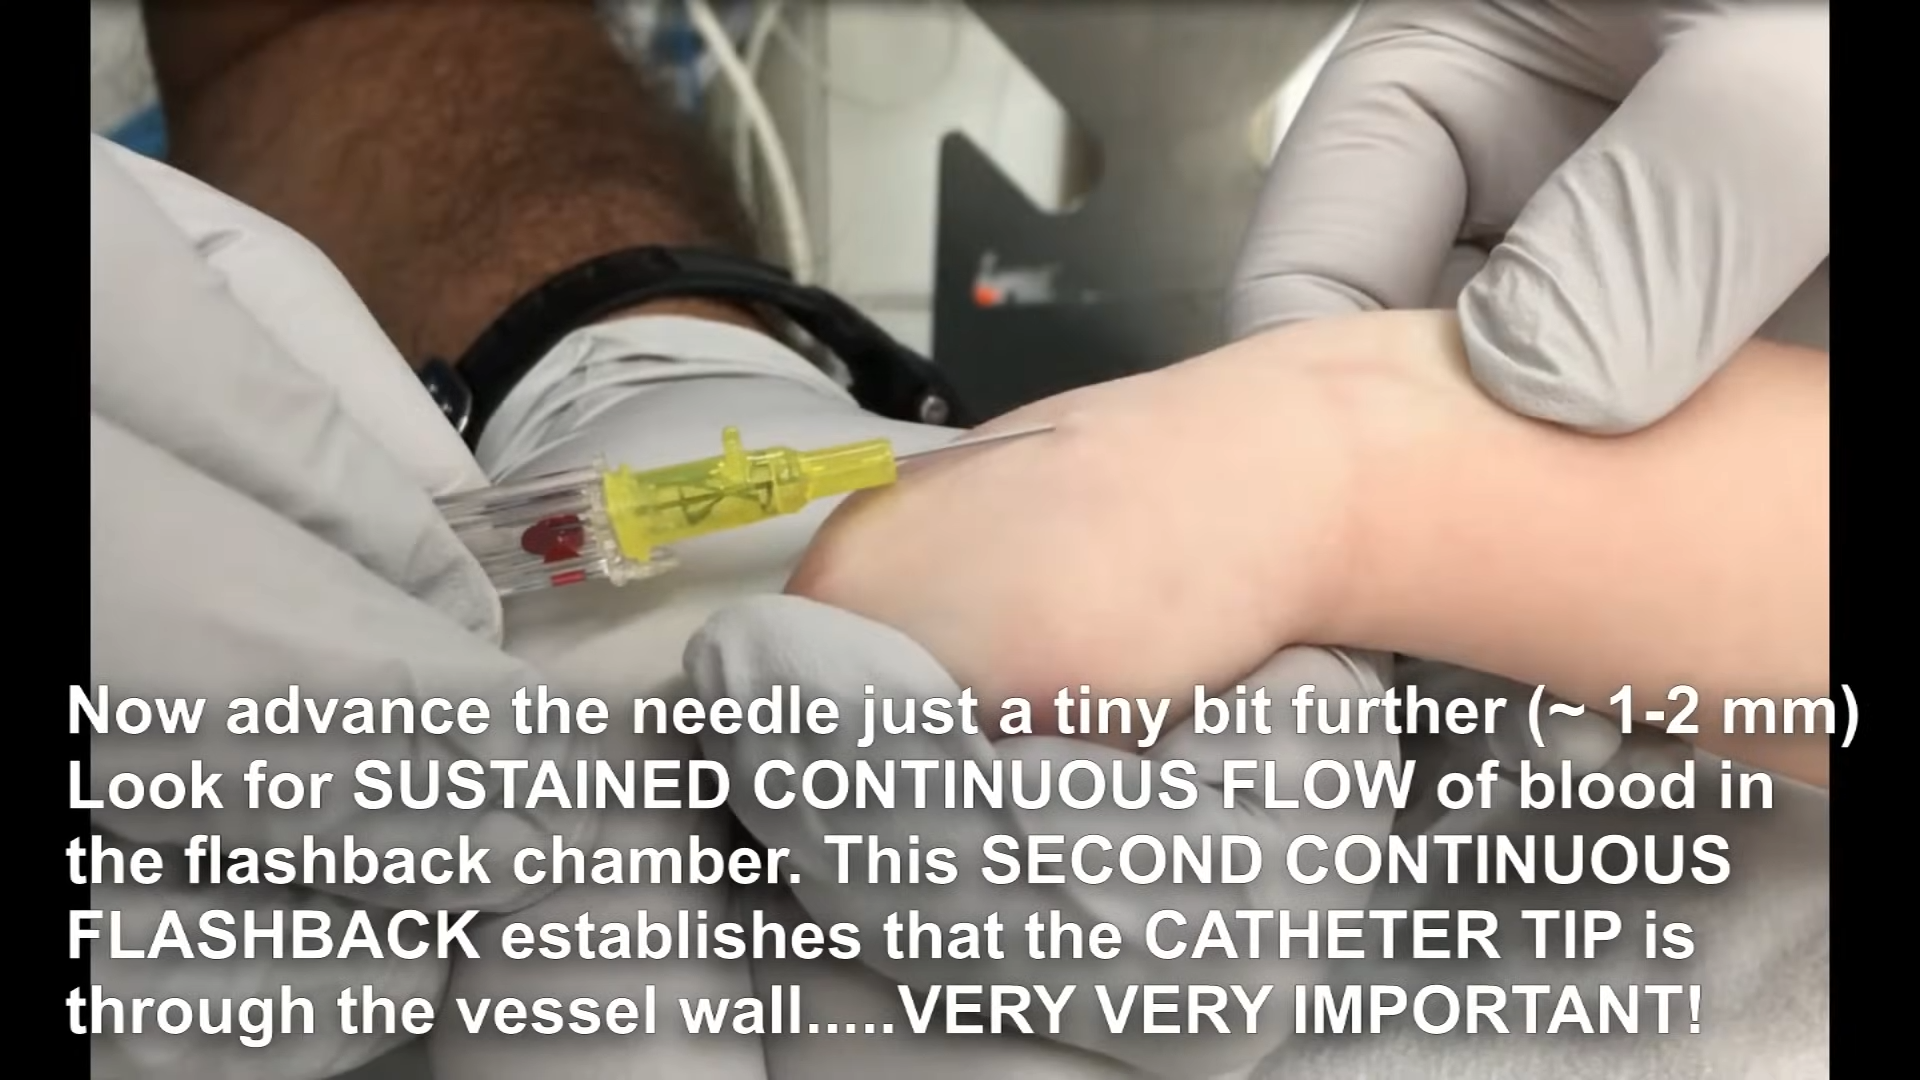
Step 4: The SECOND Flashback
Advance the entire unit just a tiny bit further (1 to 2 mm). Look for a sustained, continuous flow of blood. This confirms the plastic catheter tip has successfully passed through the vessel wall.
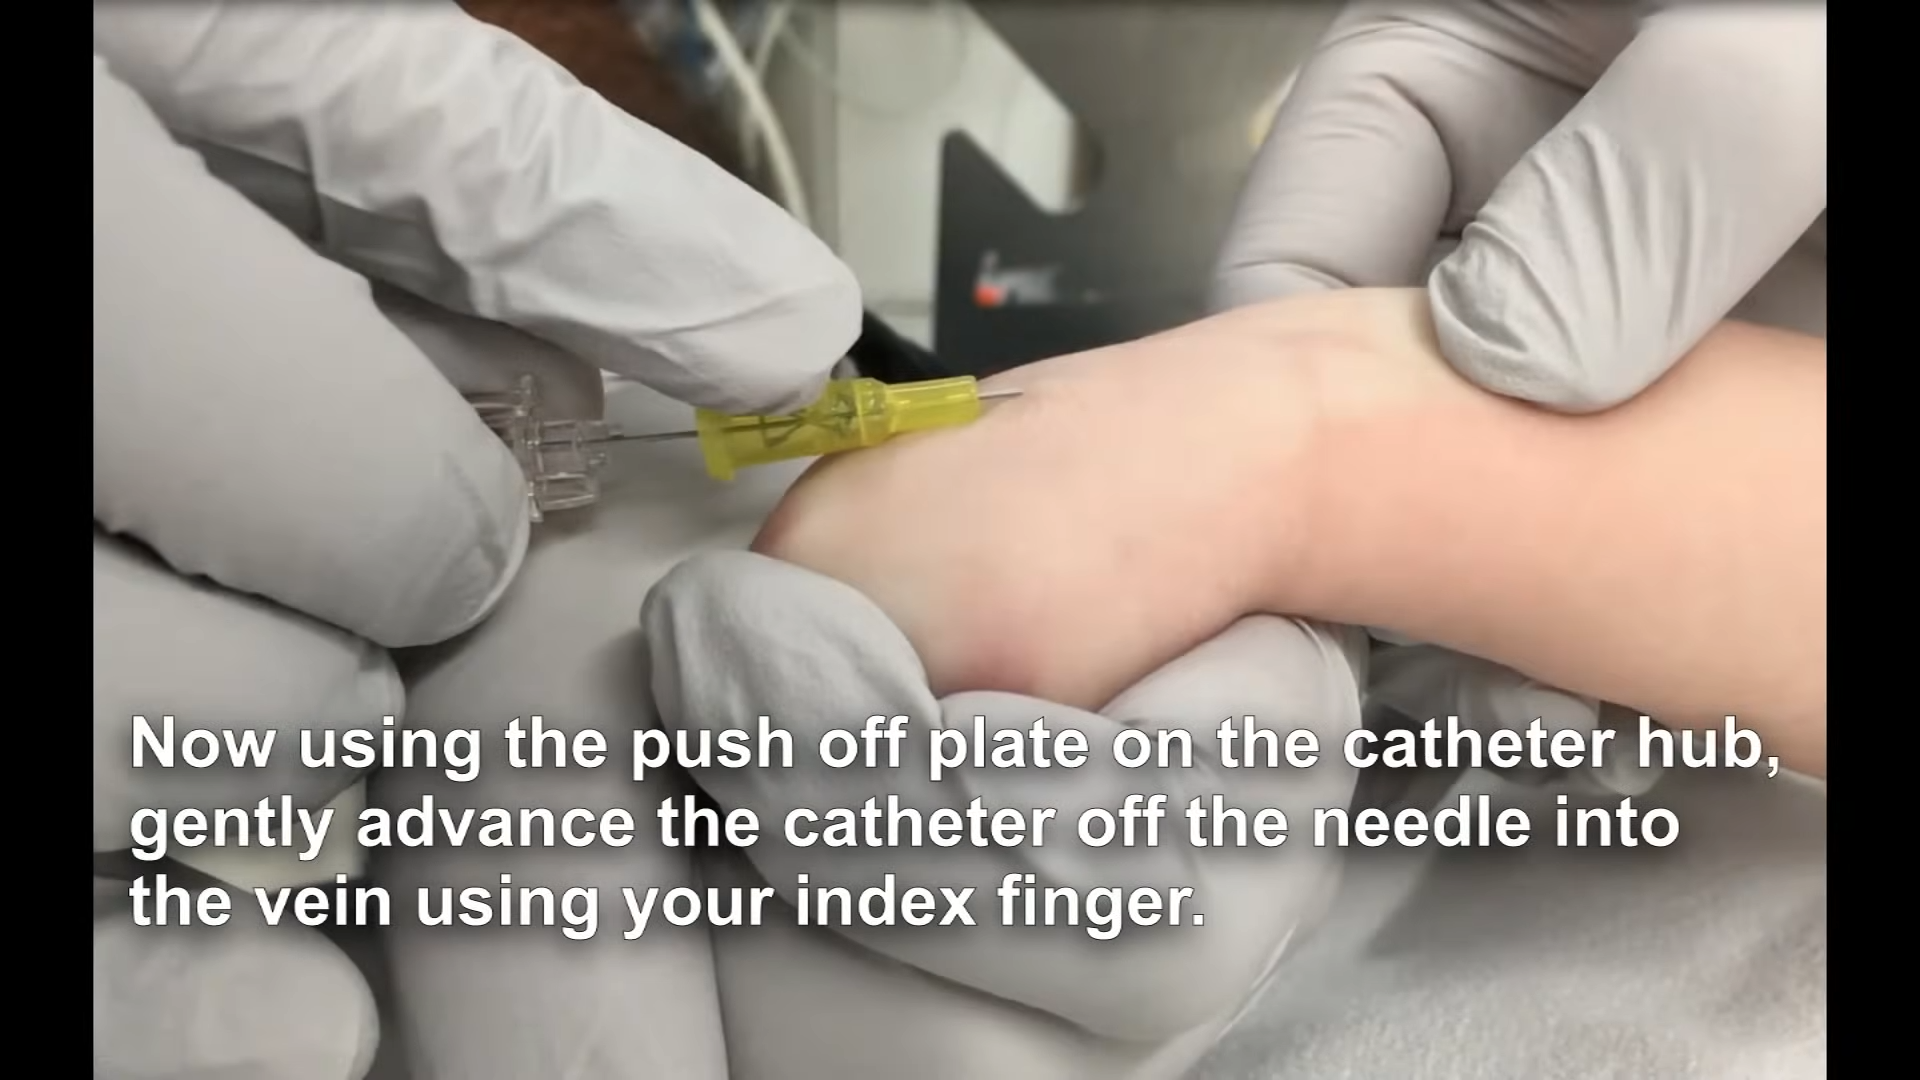
Step 5: Thread it
Using the push-off plate on the hub, gently slide the plastic catheter off the needle and fully into the vein using your index finger.
💡 Pro-Tip: Taping
Always put something underneath the hub to protect the fragile skin, and bandage the site so the cannula insertion point remains visible for regular assessment.
🚨 Escalation Rule: Maximum of 2 attempts before escalating to a Paediatric Registrar.
Venepuncture (Taking Venous Bloods)
TL;DR Summary:
Apply numbing cream 45 mins prior if possible.
Uncap all bottles before you start.
Prioritise the most critical blood sample first.
Taking venous blood in paediatrics requires excellent flow management. You can either use a butterfly needle to drip blood directly into the paediatric bottles (the "drip method") or draw it back gently into a syringe.
Procedure Steps
Ensure Pain Relief (Ametop/EMLA) has been applied and given adequate time to work (See Pain Relief page).
Secure the child using the techniques from the Positioning page.
Have all bottles uncapped, in the correct order of draw, and within reach before you pierce the skin.
Master the technique of using a finger to pause blood flow at the hub when swapping bottles.
💡 Pro-Tip: Prioritize!
Get the most crucial samples (like the EDTA for FBC, or the blood gas) first before the blood flow slows down or clots.
🚨 Escalation Rule: Maximum of 2 attempts before escalating to a Paediatric Registrar.
Paediatric Blood Bottles
Standard draw volume for these paediatric micro-tubes is 1.2ml.
Cap Colour
Bottle Type
Key Tests
Special Instructions
🟢 Green
Sodium Citrate
Coagulation / INR
🚨 Must be filled EXACTLY to the line (not to below or above it).
White cell enzymes require prior arrangement (bleep 1718), a special tube, and must reach the lab before noon (Mon-Thurs only).
🔴 Red
EDTA
FBC, ESR, Sickle Cell, Group & Save, Ammonia
🚨 For an FBC and ESR, you must either send two separate samples or ensure one EDTA tube is filled completely to the 1.2ml line.
🟡 Yellow
Fluoride Oxalate
Glucose, Lactate
Can be used for Blood or CSF.
Pain Relief & Analgesia
TL;DR Summary:
Under 1 Year: Oral Sucrose + Comfort feeding.
Over 1 Month: Ametop (Tetracaine) cream (takes 45 mins).
Always check the allergy band before applying cream.
Managing pain prevents the child from thrashing, stops veins from vasoconstricting due to stress, and drastically increases your first-time success rate.
Neonates & Infants (Under 12 months)
Oral Sucrose: Administer a few drops onto the infant's tongue or dip their dummy into the solution 1-2 minutes before painful procedures like heel pricks.
Comfort Feeding: Breastfeeding or bottle-feeding during the procedure provides excellent natural analgesia.
Topical Anaesthetic Creams
Apply to at least two potential sites and cover with a clear Tegaderm dressing.
🚨 CRITICAL RULE: Always physically check the allergy band. Ametop is an ester anaesthetic; EMLA is an amide anaesthetic.
1. Ametop (Tetracaine 4% Gel)
Onset: 30–45 minutes.
Age Range: Safe for infants over 1 month of age.
Contraindications: Premature infants, infants under 1 month, broken skin, allergy to ester anaesthetics.
💡 Pro-Tip: Ametop frequently causes local erythema (redness) and vasodilation (makes veins bigger). Warn parents the redness is normal and not an allergy!
2. EMLA (Lidocaine 2.5% / Prilocaine 2.5%)
Onset: About 60 minutes.
Age Range: Safe for full-term neonates from birth (strict dose limits apply under 3 months).
🚨 Warning: EMLA causes local vasoconstriction, which can make tiny veins blanch and disappear. If the child has notoriously difficult veins, consider Ametop instead.
Cold Spray (Ethyl Chloride)
Use for immediate numbing if you lack the 45 minutes for cream. Spray from a distance until a white frost appears, then quickly swab and insert. Warn the child about the loud hissing noise and cold sensation.